Last month, CJ and I published a new dressup game called Spooky Stylin’ as part of our arcade bundle Tomodachi 8-in-1. In this post, I want to talk about some of the programming techniques we used.
PICO-8 has limited spritesheet space, but Spooky Stylin’ needs to be able to draw a lot of different outfits. So how did we get our images to fit? We used a technique to cram two spritesheets into one! Of course, this space-saving doesn’t come for free. In order to make it work, we need to carefully manage our color usage.
The plan
At a high level, here’s the technique. There are two major steps, encoding and decoding.
Encoding
- Recolor layer 1 to use only colors 0, 1, 2, and 3 (the “column” colors)
- Recolor layer 2 to use only colors 0, 4, 8, and 12 (the “row” colors)
- Combine the layers, using the palette grid as a look-up-table to determine the combined color
Decoding
- Use only the column colors to recover layer 1
- Use only the row colors to recover layer 2
- Remap the row/column colors to the original image colors
Arranging the 16 colors into a grid to shows how to encode and decode colors. The columns tell you the color of the first image, the rows tell you the color of the second image.
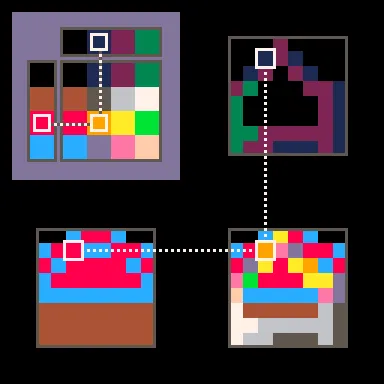
Using a color grid as a look-up-table to combine two colors.
One thing to notice is that step one restricts each layer to using only 4 colors. That’s the tradeoff we make.
A bit of theory
PICO-8 stores color using 4 bits per pixel1. In Spooky Stylin’, we restricted ourselves to using only 3 colors per clothing item, plus a transparent background color, making 4 colors in total. That means we only need 2 bits per pixel, leaving 2 bits left over for a second 4-color spritesheet!
![]()
Two spritesheets layered into one. It looks messy and chaotic.
This looks really messy, but the important part is that all the data we need is there, ready to be decoded.
Implementation details
If you believe the math then it’s possible to fit two 4-color spritesheets into one 16-color spritesheet, but making it happen in code still poses some challenges.
Encoding
The first problem we needed to solve is combining our two spritesheets so we can store them as one in the final cart. I initially assumed this would require looping through all the pixels and doing a bunch of bitwise math, but it turns out there’s a faster way!
We can use a feature of the PICO-8 graphics system called bit masking. With bit masking, when we draw to the screen, PICO-8 won’t overwrite the screen color directly. Instead, it will combine the color we’re drawing and the color that’s already on the screen. It’s like changing the layer blend-mode in Photoshop2. The final color is determined using a formula:
dst_color = (dst_color & ~write_mask) | (src_color & write_mask & read_mask)
The mask values come from an 8-bit number that we can specify by poke-ing it into memory (the first 4 bits we poke define the read_mask, and the next 4 bits define the write_mask). For example, setting the mask to 0b00110011 will make our draw calls affect only the lowest 2 bits.
We used this to combine two layers into one like so:
- clear the screen
- draw layer 1 using only the lowest 2 bits
- draw layer 2 using only the highest 2 bits
cls()
-- draw the first layer using the "column colors"
poke(0x5f5e, 0b00110011)
pal({[0]=0,1,2,3})
draw_layer_1()
-- draw the second layer using the "row colors"
poke(0x5f5e, 0b11001100)
pal({[0]=0,4,8,12})
draw_layer_2()
Decoding
Once the data is written, we still need to be able to decode it. Getting back the original image requires multiple passes of recoloring: one pass to get the layer from the combined image, and a second pass to restore the original colors. Taking it one step further, in Spooky Stylin’ we let the player pick the character’s skin tone and hair color, which sometimes adds a third recoloring.
Conceptually, my approach to managing all of this is to define each recoloring as a function. Then I can use function composition as the glue to stick multiple recoloring passes together. I go into more depth on this topic in my post on Palette Swaps. In code it could look something like this:
-- define palettes for separating layers
-- and recoloring to original colors
lyr_1_pal = tbl_to_pal({
		[0]=0,1,2,3,
		0,1,2,3,
		0,1,2,3,
		0,1,2,3,
	})
lyr_2_pal = tbl_to_pal({
		[0]=0,0,0,0,
		1,1,1,1,
		2,2,2,2,
		3,3,3,3,
	})

skin_pal = tbl_to_pal({4,2,7})

green_skin_pal = tbl_to_pal({
  [4]=11,
  [2]=3,
  [7]=7,
})

hat_1_pal = tbl_to_pal({9,10,7})

-- draw the base character from layer 2 using green skin
pal(pal_to_tbl(chain({lyr_2_pal, skin_pal, green_skin_pal})))
draw_character()

-- draw hat 1 from layer 1
pal(pal_to_tbl(chain({lyr_1_pal, hat_1_pal})))
draw_hat_1()
Acknowledgements and Inspiration
I wrote my own implementation, but I’m certainly not the first to try out this technique in PICO-8. I first learned about it from the post Layering Sprite Data by 8bit Caaz. I also found these two BBS posts by Two_Owls helpful.
Footnotes
Footnotes
-
Quick binary refresher (or primer): a bit holds one of 2 values (either 0 or 1). An n-bit number can differentiate between 2n values. Equivalently, a choice between n values can be stored in one log2(n) bit number. A 16-color image uses log2(16) = 4 bits per pixel. ↩
-
I haven’t actually used Photoshop in years, but I think it’s still the most widely-recognized image editing software that has layers. I would have felt a little too hipster saying “it’s like layer blend-modes in Procreate”. ↩